Technological inheritance, defect inheritance, and quality inheritance transfer to the future. To create a better future for your organization you first must create a better past so it can later inherit the preordained successes you designed and imbedded into your company.
Keywords: technological inheritance, defect inheritance, quality inheritance, quality assurance
Technological inheritance from manufacturers influences 40% of operating plant failures.1 Coupled with the 35% of failures from project design errors,2 and 75% of all your equipment failures are explained by what happened long in the past.
Technological inheritance (TI) is the transfer of equipment component quality characteristics from a manufacturing step to a future process step. A defect in an item or work done in a prior step that causes trouble in a later step is termed an “inherited” defect. It is an error or fault that travels along with the item or job and becomes a future problem in the same process or in another process.
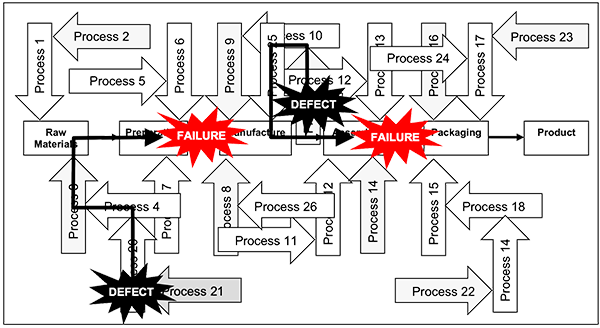
Every defect in design or manufacturing has potential to impact numerous future operational steps. One defect may only become a minor irritation, while another could turn into a severe business- destroying, or life-destroying disaster. Figure 1 shows what technological inheritance does to a business—a defect created in a prior process leads to serious failure in downstream processes.

Transferred defect inheritance is involved in many industrial business problems. Operationally it causes early life, random and rapid wear equipment failures. Near to half of failures during the
service life of equipment parts are by inherited weaknesses and faults from a part’s poor design, such as rigidity variations across a component, or by bad manufacturing quality choices, like rough machining causing high microstructure surface stresses, and bad practices by component makers, for example, hold-down clamping forces distorting a component.
Transferred Defect Inheritance and Quality Inheritance
A common example of defect inheritance found in machinery is the adverse impact on parts from bad machining practices during manufacture.3 Three groups of alloy coated steel parts were machined with differing surface roughness, Group 1 was coarsely rough machined, having a surface roughness of 80 micron between topographic peaks, another group was rough machined with 20 micron roughness, and the final group were given 0.32 micron roughness by grinding. All groups were heat treated to harden the surface coating and ground to a finish surface roughness of 0.16 micron, then put into wear trials to find their resistance to abrasion. The coating of the Group 1 specimens wore out the quickest and suffered the greatest number of surface cracks. Group 2 specimens had less wear and fewer cracks than Group 1, and Group 3 had little wear with no cracks at all. Under the microscope a difference in the coating microstructure was observed. The Group 1 rough machining had generated greater heat and produced high internal stresses that had caused many crevices, defects and microcracks in the coating, but these were not present in the Group 3 specimens. A quality characteristic of a prior process step had changed the behavior of a subsequent process step. Surface hardness is important for machine parts that wear during service. If a machine had Group 1 rough machined parts installed, its maintenance costs and production downtime would be far more than had Group 3 parts been fitted. The quality characteristics of a manufacturer’s machining process have dire consequences for the businesses using their machines.
Another example of defect inheritance is a shaft journal machined out of round in a rough turning step, which is later turned or ground to the finished size in a fine machining step, will have retained its initial oval trait. The ovality is inherited for the life of the journal. If the oval journal is within the tolerance for its size and shape it will pass dimensional inspection and be used in service, but the ovality produces higher localized stress in the rolling bearing mounted on the journal. During operation the higher local stress combines with other stresses to increase the probability of early bearing failure. To prevent the fine turning step making oval shapes in journals it is necessary to go back into the prior manufacturing process steps to find the faults that caused the oval shape. The problems uncovered in the previous manufacturing steps would themselves have come from earlier failures in the process. Those early failures would have still earlier defects. You would find that there are ever repeating steps of transferred defects followed by the troubles they cause.
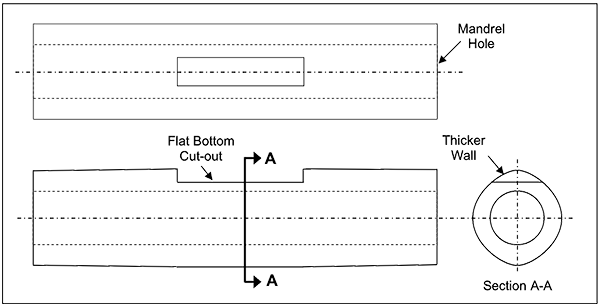
In many cases it is impossible to explain equipment failure until its technological inheritance is considered in the creation of the original defect. An example is where the wall thickness between an axial hole through the center of a batch of machined metal sleeves and the outside surface was never consistent thickness and the sleeves never fitted properly in the equipment.4 The sleeve manufacturing process included rotary grinding the outside surface of the sleeve into which a flat bottom cutout had been machined along a portion of the surface in a previous step, as shown in Figure 2. The cutout section made the sleeve wall thinner and reduced the second moment of area along that portion of the sleeve. The sleeve was less ridged in the plane of the flat. With each revolution of the sleeve it flexed away when the less stiff cross-section rotated against the grinding wheel, then returned back as the stiffer portion of the sleeve came around to be cut. The thickness of the sleeve changed because of the changing stiffness of its cross-section. Without knowing the technological inheritance of the machining process users of the sleeve would suffer ongoing failures they could never solve because they could not know how the defective dimension was first created by the cross-sectional flexing under cutting load. Very few equipment users would know their operating troubles started with the sleeve design until they went back to the manufacturing process and “saw” how the poor design permitted and encouraged their production failures.

Defect inheritance occurs in all processes, not just parts manufacture. Any time an error, a misjudgment, a bad decision, a fault, a deficiency, or any other possible adverse outcome that can occur in a process step happens, it will create the opportunity for problem after problem to arise later. The problems cannot be stopped when they arise, they can only be fixed, replaced or lived with. Problems stop when there is no defect present in the first place to cause the problem.
The same data and examples above of defect inheritance apply to the exact opposite—quality inheritance. Top quality results achieved earlier in a process also transfer to future process steps. Doing fine quality work brings its own satisfaction and success, but also it brings more success later in the process and in future processes because quality items used in service perform reliably by design, whereas items containing defects eventually fail. High quality results always contribute to the production of good results later, but poor quality work will only harm future success. The better the quality you produce in each process step and job task, the higher is the chance of success in all the subsequent steps of the future processes that use that quality characteristic.
This is why and how setting and achieving higher quality standards makes fortunes for the makers of quality products and services, and also for their users. Defective work and equipment can’t last, but masterly craftsmanship and quality machinery go on and on.
A core strategy in the Plant Wellness Way EAM asset management methodology is to build your business processes to stop defects and instead create high quality results. Companies that license the Plant Wellness Way EAM methodology learn how to get quality inheritance success forevermore. To get Plant Wellness quality into your company you first need to build your operation’s processes and procedures the Plant Wellness Way. Ask any Plant Wellness Way Consultant what to do.
Mike Sondalini www.plant-wellness-way.com
1 Osarenren, John. Integrated Reliability, Condition Monitoring and Maintenance of Equipment, Page 17, CRC Press, 2015
2 Barringer, Paul H. “Life Cycle Cost & Reliability for Process Equipment.” Accessed September 14, 2015. http://www.barringer1.com/pdf/lcc_rel_for_pe.pdf.
3 Osarenren, John. Integrated Reliability, Condition Monitoring and Maintenance of Equipment, Page 108
4 A. M. Dalskii, A. S. Vasiliev, “Fundamental Aspects of Mechanical Engineering.” Chapter 6, Manufacturing Technologies for Machines of the Future, Page 189, Springer, 2003
 Ask a question or send along a comment.
Please login to view and use the contact form.
Leave a Reply