As you begin design validation (DV) and product validation (PV) testing you are entering the more formal phase of a test program. Usually, you are working to internal and/or customer test specs with timelines that are critical and little margin for error. If you’ve conducted adequate design verification testing and given your parts a chance to fail on test exposures that are similar to those your product will see in the field, you have reason to expect to be successful in validation [see previous article outlining accelerated test methods: Expect to Pass Validation].
The job of the validation engineer is to develop a test plan which involves testing the right parts on the right tests. A validation plan created this way will allow you to make an accurate assessment of product reliability and protect your company and thus your customer from experiencing product failures before reaching its design life. Note that an assumption inherent with this approach is that manufacturing controls are in place to ensure that products are built to specification. Obviously, this is not always the case.
Right Parts: Validation test samples should represent expected design and manufacturing variation:

- DV parts should be selected or intentionally built to represent the full range of the design spec. Since you cannot afford to build every possible permutation of limits, a best practice is to select limits of components or design features that contribute to high-risk failure modes as identified in a DFMEA. DV parts are often built using soft/prototype tooling and prototype processes.
- PV parts should represent production variation by being randomly sampled from a qualified manufacturing process. When possible, sample parts across shifts, fixtures, machines, operators, and material sources.
The number of test parts that you build will depend on whether your test is a capability test or a reliability demonstration test (RDT). Capability tests are designated for those test exposures that are either low risk or low occurrence. For these tests, typical sample sizes are 3 to 6 pcs. RDT’s on the other hand exercise high risk exposures and failure mechanisms and require a statistically significant sample size, which depends on whether it is a success-based test or a test-to-failure.

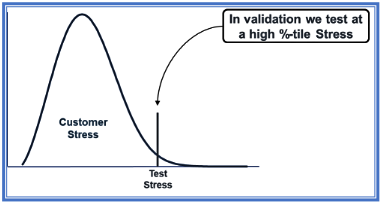
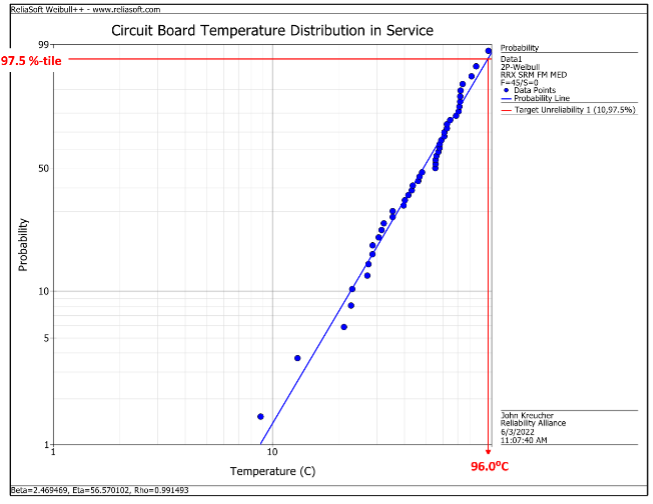
Right Tests: Validation test plans should have a rigorously established correlation to field exposure and use. This requires that you first obtain field stress data (environmental stresses and duty cycles) and then select the stress level to use on test. The validation test stress level you choose should represent a high severity customer. A typical validation test stress level represents the 95th %-tile customer exposure but it could be something else, e.g., 97.5 %-tile. It is a business decision, but I don’t recommend testing higher than this unless you are dealing with a safety-critical failure mode. If you don’t know this distribution, you are not alone! This is very often the case and a common reason for field reliability issues even after a “successful” validation.
So how do you arrive at a field stress distribution?
Your options:

- Obtain from customer: Your customer may have these data, sometimes embedded within their spec, but often not. Either way, this should be challenged to make sure it truly represents what your product will experience in the intended application.
- Obtain from internal spec: As with a customer spec, this information should be challenged. Internal test specs (like customer specs) are often based on prior or similar products and applications. In some cases, they are true legacies, having been passed down from spec to spec over many years!
- Measure directly: This involves instrumenting parts with thermocouples, accelerometers, etc., and collecting data with DAQ equipment as your product is run according to a predefined usage profile and/or under normal usage. In any case, it is necessary to know or make an assumption about how this usage relates to the life of the product in the field. In the case of smart products, you will want to make use of existing onboard usage and error logs.
Example: In the automotive industry, instrumented parts are run on test vehicles driven on carefully defined drive schedules which may include segments of high speed, city, rough road, hills, towing, etc. These drive profiles are created to represent a known fraction of the design life of a vehicle. This knowledge allows test engineers to create histograms (or probability density functions) of time spent at various stress levels on their part. From there, it is a simple matter of determining the (say) 97.5th %-tile stress level.

When product stress levels are significantly influenced by ambient conditions, it may be necessary to make use of online surveys of environmental data (e.g., temperature, humidity). In these cases, it will be necessary to account for all of the geographic region(s) that you expect the product to be used. Reference for example NOAA.gov.
Note on Customer Validation: Even the most rigorously developed validation test is a condensed and compromised version of field exposure. It excludes so-called non-damaging time as well as interactions and test environments that are not considered. And in the case of sub-system or component validation, they are often not tested with the mating pieces in place. Thus, validation testing cannot capture every potential failure mode. If this compromise is deemed to be important for your product line, consideration should be given to Customer Validation. That is, install sample parts in end-user’s hands. Even if you are unable to do this with a statistically significant sample size, the failure modes uncovered with this activity may prevent the next big warranty event.
 Ask a question or send along a comment.
Please login to view and use the contact form.
Leave a Reply