Introduction
When it is necessary to check 100% of parts for one or more characteristic?
There are situations where 100% of manufactured parts are checked. These include visual inspection, measurements of a part characteristic, and a reaction to low process capability. These may be accomplished manually or an automated process.
FMEA
Some potential failure modes can be identified in FMEAs. In the Severity column, safety, regulatory, and performance risks are identified with a high score. When the failure probability is high, controls are inadequate, and/or detection is low, then risks are high, and summarized in the RPN column. A review of both design and process FMEAs should be used to determine where to required quality actions.
100% Inspection
Manual 100% inspection usually refers to visual checks for flaws or a simple go/no-go part testing, perhaps with a gage block.
For example, during serial production, an electronic manufacturer used a wave solder operation to attach components to printed circuit boards (PCBs). These PCBs are assembled into electronic modules. Solder bridges and gaps were found on finished PCBs. Bridges create short circuits and gaps create open circuits, affecting module functions. A P-chart at the output of wave solder operation showed about 40% of the PCBs had these defects.
Many solder bridges and gaps can be detected visually. The short-term containment action was to hire a large group of temporary workers to inspect each PCB and then repair as required. A large area of the plant was used for the work, hampering smooth normal operation.
Many studies have shown that manual inspection of complex parts, especially electronics, is only 80% effective. The work is repetitive and leads to worker fatigue. Some solder defects are hard to recognize, but may pass inspection. If a fault were detected later in the manufacturing process, then the module would need to be disassembled and repaired; or scrapped. If not detected, then external failures may generate high warranty costs, litigation expenses, regulatory/compliance costs, or low module reliability.
Sometimes, redundant manual inspection is used, but this is ineffective. For example, if the defect rate is 40% and inspections can detect 80% of the defects, then a single inspection reduces the defect rate to about 8%. This is still unacceptably high. If a second inspection occurred, the defect rate would be about 1.6%, again inadequate. However, human factors, such as an inspector relying on another to detect errors, would reduce inspection effectiveness.
The root cause was the PCB circuit and component layout was not designed for solderability. The long-term corrective action was to redesign the PCB layout to eliminate the solder bridges and gaps.
Functional Testing
Functional testing is necessary in the some industries when the consequence of a non-conformance is high. External failure costs can easily exceed the cost of 100% functional testing. In other situations, customers have contractual requirements for a manufacturer to perform 100% functional checks.
The serial production of electronic modules relies on 100% automated testing. Electronic modules need to be functionally tested. Complex electronics, like engine control modules, perform hundreds of critical operations, many of which can be checked at the end of the manufacturing.
In modern electronics manufacturing, components are automatically placed on PCBs by “pick and place” machines. Sometimes surface tension effects will cause a component to become misaligned. Vision systems automatically check for the correct placement of parts on printed circuit boards. This avoids worker fatigue, but depends heavily on skilled engineers and technicians.
“Bed of nails” testers are used to check for proper electronic continuity (resistance) between circuits on every PCB. Solder bridges, gaps, and misplaced components can be detected with this operation.
Process Capability
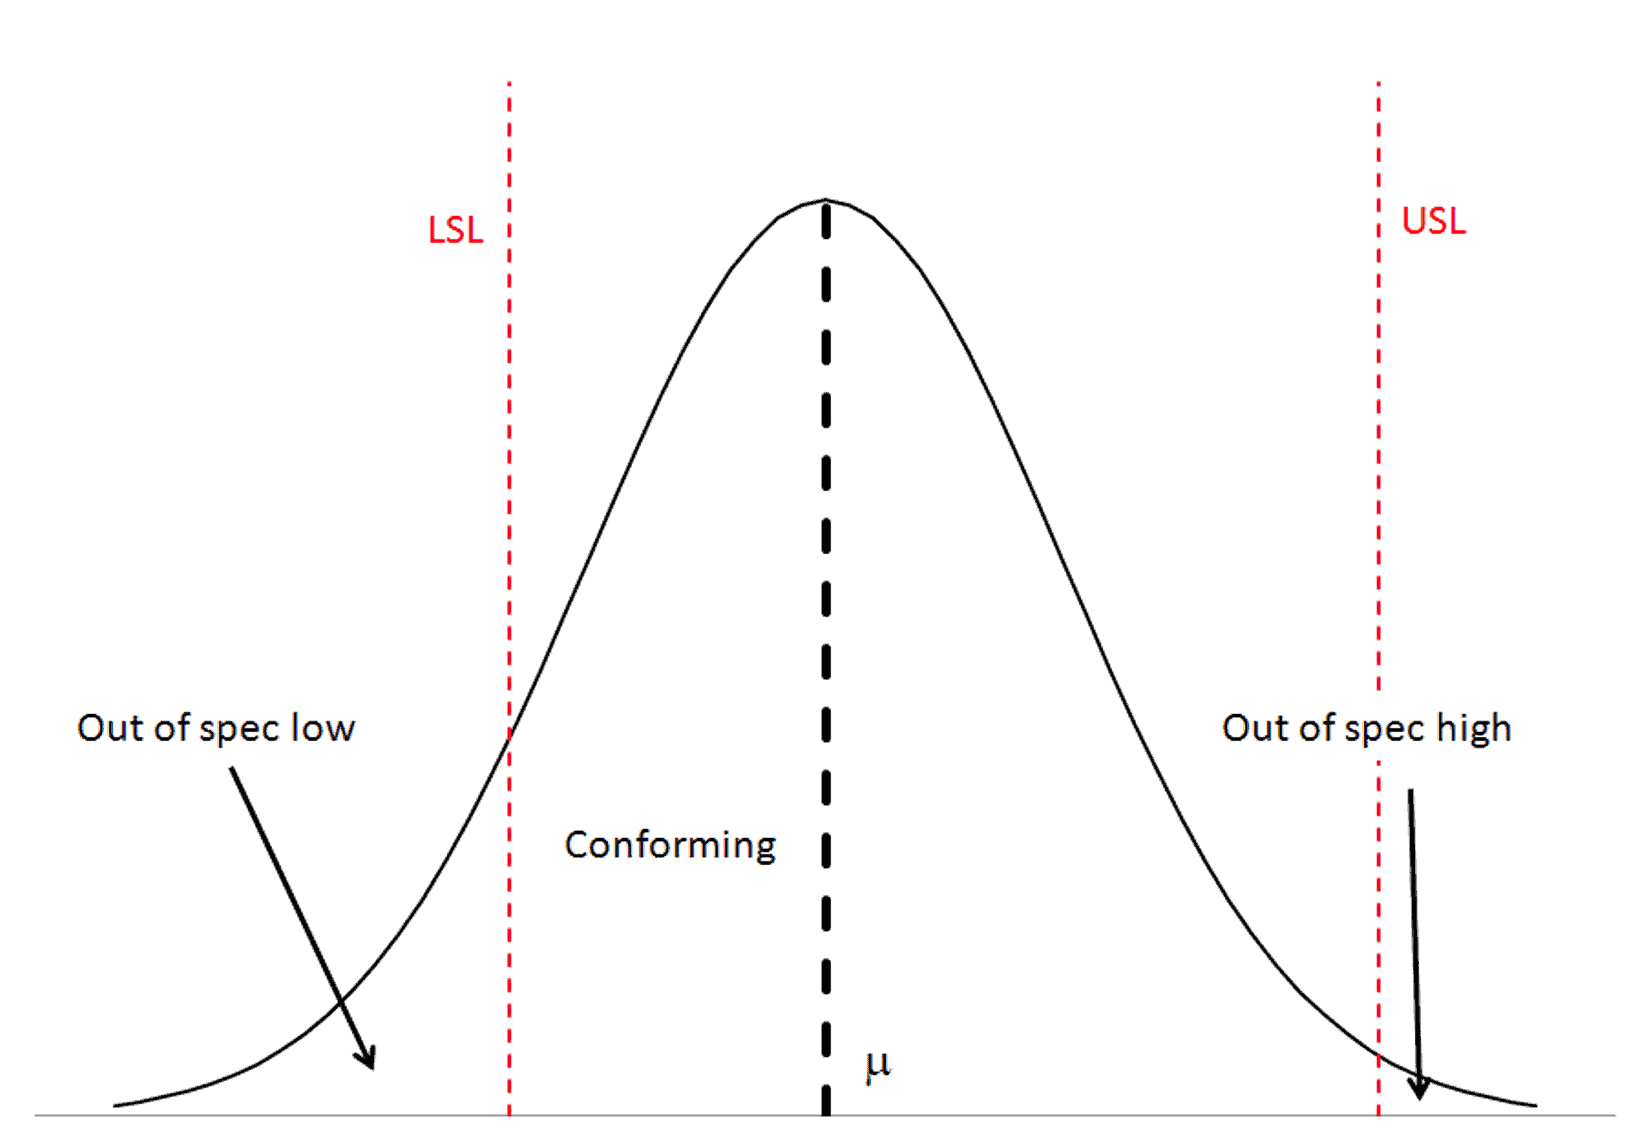
Consider a process used to produces parts with a critical characteristic beyond engineering specification limits. Assume the characteristic is normally distributed, is not centered to the middle of the tolerance limits, and has too much variation, figure 1.

Figure 1
Even if the process is shifted to the center of the specification limits non-conforming parts because of excessive variation. Manufacturing engineers may believe the tolerances are too tight so they want to broaden the limits. This would require the concurrence of the customer, design engineering, and management, but may increase external failure costs. To permanently improved process capability, the process variation to be reduced. The process variation is composed of measurement error and part variation.
Measurement System
The measurement system needs to have the capability of measuring parts accurately. The 6$-\sigma-$ width for measurement error needs to be less than 10% of the tolerance width to be acceptable; between 10% and 30%, is considered marginal; and greater than 30%, is unacceptable. In situations where the tolerance limits have not been set, the measurement error is compared to total variation in the test. To learn about this topic, consult the “Measurement Systems Analysis Reference Manual, 4th Edition”. I plan to discuss this in a future article.
The Process
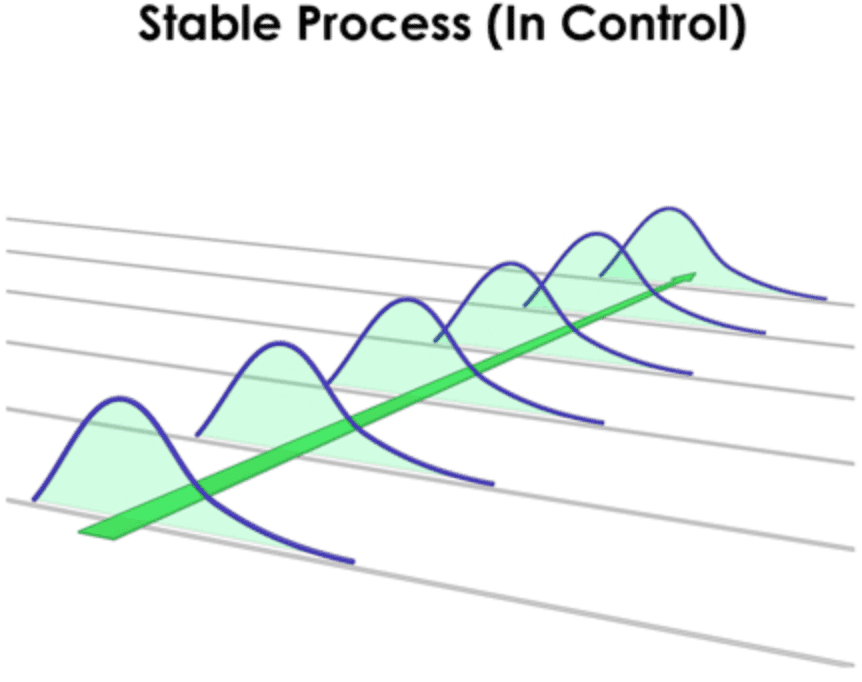
If SPC or 100% testing has occurred, then data should be available that cover a broad time period and many production lots. The sample size, sample mean, and sample standard deviation are calculated for each lot. If the process is under stable, then the distribution for each lot should look similar over time, figure 2.

Figure 2
Reference: DataNet Quality Systems
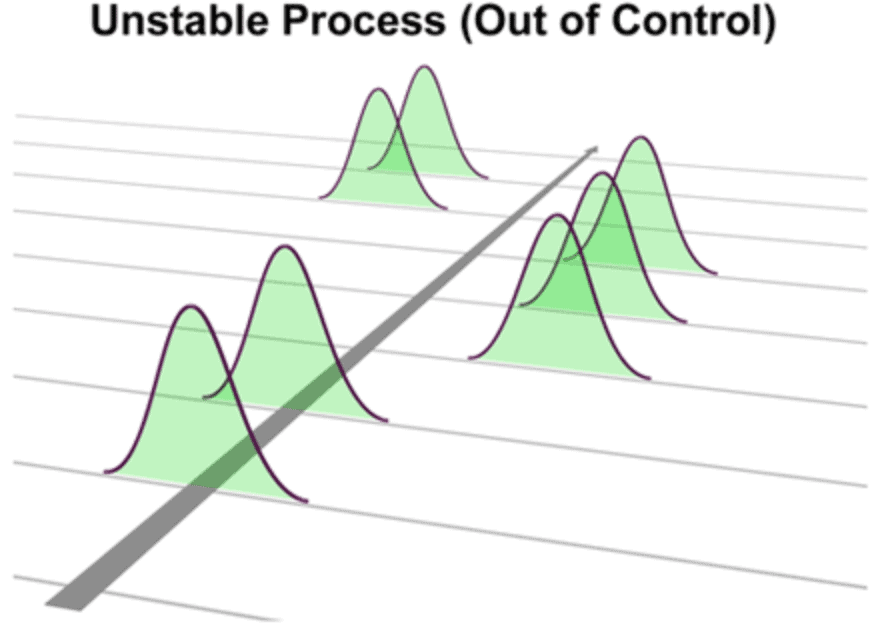
Figure 2 does not show any change in the process mean or the variation. In an unstable process, the mean and variation change with time or lot. Figure 3 shows a process with mean shifts, but stable variation.

Figure 3
Reference: DataNet Quality Systems
The mean shifts would be compared with the lot standard deviations to determine if the mean shifts are statistically significant. If significant, then the process is out-of-control and indicates special causes of variation are present. A similar process is used to assess variation.
Improvement
To improve the manufacturing process, the factors that contribute to variation need to be identified and controlled. These include
- Manpower: Shifts, training, substitutes.
- Materials: Sources of different inputs.
- Methods: Are they documented, available to personnel, and training available.
- Environment: Is the environment controlled
- Equipment: Are the process settings defined and controlled.
Wikipedia provides a good reference to the Ishikawa diagram to determine the potential caused of variation. When more than one factor is suspected of causing variation, consider using Design of Experiments (DOE).
DOE allows one to study different factors with different levels simultaneously. For example, factors could include different process time and temperature settings. A 2-factor DOE can determine how the time and/or process temperature settings affect the output. If the effect is important, there is an opportunity to selects time and temperature setting to optimize the process and reduce variation.
Conclusions
- When the consequences of failure are serious, 100% functional, visual, and other testing may be necessary.
- Manual inspection operations are not effective and should be a last resort.
- If a process has low capability to meet a specification, then the process needs to be improved.
- As a containment action, 100% testing or visual inspection may be used.
- To improve capability, process variation needs to be reduced.
- A good measurement system is required.
- Study the process to determine what factors cause variation.
Note
If you want to engage me on this or other topics, please contact me. We can discuss your problem/concerns, and to determine if I can help solve your analysis, design, and manufacturing problems. I provide onsite training in quality and reliability tools.
I have worked in Quality, Reliability, Applied Statistics, and Data Analytics over 30 years in design engineering and manufacturing. In Wayne State University, I taught at the graduate level. I created and presented Minitab seminars to corporate clients, write articles, and have written papers and presented at the SAE, ISSAT, and ASQ.
Dennis Craggs, Consultant
Quality, Reliability and Analytics Services
810-964-1529
 Ask a question or send along a comment.
Please login to view and use the contact form.
Stating that 100% inspection is only 80% effective is only applicable to manual/visual human inspection. Todays automated laser and machine vision inspection systems are orders of magnitude better, meeting “Zero Defect” demands.
I agree that technology is improving the inspection process. However, “Zero Defects” in this context is conformance to specification limits. It is important to consider that many features are internal. Mechanical components could have voids that would weaken parts. In automotive electronics, visual inspection systems are focused on parts placement. Internal component features could still cause defects which is why electronic modules were subject to functional testing. Functional testing is also limited for complex electronic modules. Function is controlled by software. Failure modes can be caused by conflicts between functions or operating conditions.